Dec 28, 2024
Dec 28, 2024
Dec 28, 2024
Dec 28, 2024
Dec 28, 2024


Updated: May 11, 2025
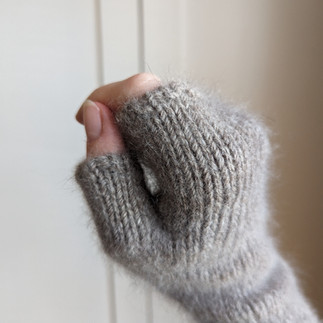
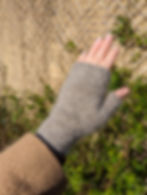
You know that extra special yarn you’ve been stashing for way too long? I’ve had a 50g skein of angora rabbit / BFL in my stash for years, I bought it at Yarndale (a big yarn festival in the UK) from a lovely vendor who breeds angora rabbits, their brand is called B13 yarns. I don’t think you can buy it anywhere online, but if you see them at a festival go give the yarns a squish! Anyway… I have been wondering what to make with it for years, I decided to make a pair of super plain and simple fingerless mittens to allow the yarn to absolutely shine, and so that I could get the most of that amazing feeling of angora fluff on your skin. Of course, I couldn’t find exactly the pattern I wanted so I wrote my own, and it’s available to you for free! So go shopping in your stash for something a little bit special in a DK weight and cast on these quick mittens. They’d also work great holding a few strands of finer weight yarn together, I mean who doesn’t love a marled effect?!

Sizes: XS (S, M, L, XL) (XXL)

Hand diameter: 6 (7, 8, 9, 10) (11)” / 15 (18, 20, 23, 25) (28) cm
Hand length from base: 6.25 (6.75, 7, 7.5, 8) (8.5)” / 16 (17, 18, 19, 20) (22) cm
Choosing a size: Select the size closet to your measurements.
Yarn: Sample uses DK weight angora/BFL blend (110m/50g). Any yarn that meets the gauge can be used.
Yardage: 40 (45, 45, 50, 60) (60) grams / 90 (100, 100, 110, 130) (130) metres / 96 (108, 108, 120, 144) (144) yards
Gauge: 22 sts and 30 rows per 4” / 10cm in stockinette.
Needles: 3.5mm circular and/or DPNs or needle size required to meet gauge.
Abbreviations:
k | K |
p | Purl |
sm | Slip marker |
M1L | Make one left |
M1R | Make one right |
Sample info: The sample is size S knitted on 3.5mm needles using an angora/DK blend (110m/50g) and used approx. 40g for both mittens.
Notes: This pattern has not been through a test knitting process, so please report any errors you find in the pattern and feel free to share your thoughts on the final fit of the mittens in relation to your size. I’d love to see your makes in Ravelry projects and on Instagram using the hashtag #hirismakesfreemittens.
For general pattern advice see: https://www.hirismakes.com/post/pattern-information
Cast on 32 (38, 44, 50, 56) (60) sts using the tubular stockinette hem by Modern Daily Knitting or a 1x1 tubular cast on in the round.
If you are not keen on these methods use a different stretchy cast on technique and work one round in k1, p1 ribbing.
Place a stitch marker for the BOR.
Knit in stockinette in the round for 4” / 10 cm.
You may make the cuff longer or shorter, but consider the additional yardage required.
k 6 (6, 7, 8, 8) (9), place marker, knit until k 6 (6, 7, 8, 8) (9) before the BOR, place marker, knit to BOR.
1. Knit to next marker, sm, M1L, knit to next marker, M1R, sm, knit to BOR (+2 sts)
2. Knit 2 rounds
Place a removable clip-on marker on the first increase round to help you measure the length later.
Repeat steps 1 & 2 a further 5 (5, 6, 7, 7) (8) times until you have a total of 44 (50, 58, 66, 72) (78) sts, on the last round end at the second additional marker (the one before the BOR).
Place the next 12 (12, 14, 16, 16) (18) sts between the markers on a spare cable or waste yarn, remove the BOR marker.
Place a new BOR and continue knitting the remaining sts in stockinette in the round until your piece measures 4.75 (5, 5.25, 5.5, 5.75) (6.25)” / 12 (12, 13, 14, 15) (16) cm from the first increase.
k1, p1 ribbing for one round.
Bind off using an Italian bind off.
Thumb:
Pick up the 12 (12, 14, 16, 16) (18) thumb sts places on hold earlier plus an additional 2 sts in the opening to the hand, knit in stockinette in the round for 1 (1, 1.25, 1.25, 1.5) (1.5)” / 2.5 (2.5, 3, 3, 4) (4) cm.
k1, p1 ribbing for one round.
Bind off using an Italian bind off.
Repeat the instructions for the second mitten, weave in ends, using the yarn end at the thumb to close any visible gaps from the thumb pick up. Wash and block.
Share your make with me on Ravelry and Instagram @hirismakes